Web pages no longer need any introduction: it's almost taken for granted that anything of importance can be found somewhere on the web. This article will teach you the basics of creating web pages using Dreamweaver.
Our approach will be to some degree that of the HTML "purist," meaning that we'll emphasize following HTML standards and using HTML the way it was intended. Web pages are different from printed pages in that they can be read by a variety of browsers, from the typical PC running Firefox or Internet Explorer, to handheld computers, to wireless Internet phones, to assistive technology like screen readers. All these devices will present a web page in a different way, but a page that follows HTML standards will be clear and readable in all of them. The problems come when authors either don't understand the purpose of HTML markup, or intentionally misuse it to make their page look the way they want it to on a standard PC. Cascading Style Sheets, which we'll also discuss, give you more control over appearance than HTML markup, are easier to use, and won't confuse other browsers.
This document is intended for both novice web authors and web veterans who want to move up to Dreamweaver. It is a tutorial in that we will go step by step through the process of creating a sample page. Novices should follow all the steps--the only way to learn web design is to actually do it. Veterans may want to just read through for the techniques and then apply them to their own pages. If you do follow all the steps, be careful not to overwrite your current web pages.
Web authors should be aware of the University's Policy Governing World Wide Web Accessibility. There is no enforcement mechanism for this policy, but that does not mean making your pages accessible isn't the right thing to do. Fortunately, writing proper HTML gets you most of the way there.
The HyperText Markup Language
The World Wide Web is nothing more than a collection of computers that promise to send out web pages when asked. Web pages (at least the ones we're going to make) are written in HTML, which stands for HyperText Markup Language. HTML was developed by physicists at CERN, and it shows. Fortunately we will rarely have to deal with HTML directly--we'll get Dreamweaver to write HTML for us. But let's take a look at some just to see what it's like. Consider this HTML Sample. Now use your browser to look at the HTML that creates this page: click View, then click on either Page Source or Source depending on what browser you're using. It starts with a bunch of information for your browser; the actual text starts after where it says <body>.
HTML uses "tags" to provide information about the text, and a browser uses these tags to decide what to display to the user. For example <p> marks the beginning of a paragraph, and </p> marks the end. <h1> and </h1> do the same for a level one heading. If you compare the code you're looking at with what your browser is displaying, you'll see that your browser decided to make the level one heading big and bold. Headings are examples of what is called "structural markup" because they give information about the structure of the document.
The next line says it's a level one heading, but if you look at the HTML markup you'll see it's really just an ordinary paragraph with some additional tags that tell the browser to make the text big and bold. The next line does the reverse. It's just some text that we want to be big and bold. This is considered very bad form, and an example will explain why: screen readers (programs that read web pages out loud for the blind) often denote a heading by pausing before and after reading it. If we mark headings as "big and bold" rather than as headings, or mark regular text as a heading just to make it big and bold, we sabotage this process.
The goal is to make sure that a page retains its functionality, if not its appearance, no matter how it is presented. Screen readers make good examples because having a page read out loud is about as different from seeing it on a PC as it gets, but the same principles apply to handheld computers, wireless Internet phones, and devices we haven't even seen yet. The World Wide Web Consortium (W3C, the people who write HTML standards) refers to this as "transforming gracefully."
Most documents you've probably worked with (Word, PDF, etc) have a single form. HTML pages do not. HTML pages are "rendered" by the reader's web browser and different browsers may render them differently. We add another layer to this process when we choose to use an HTML editor like Dreamweaver rather than writing the HTML ourselves. Dreamweaver will translate what we write into HTML, which a browser will then translate into what the user actually sees.
If this sounds hard to control, you've got the idea. But if you can give up on controlling the exact appearance of your pages, you'll see how this flexibility allows your pages to be used by the broadest possible audience without any additional effort on your part. Nor does this mean your pages have to look ugly: while controlling appearance with HTML is a bad idea, controlling appearance is the whole point of Cascading Style Sheets, which we'll cover as well.
Running Dreamweaver
The SSCC has made Dreamweaver available to all SSCC users on Winstat. Please see Using Winstat for instructions on logging in. When running Winstat you are essentially using a different computer. You may need to redo drive mappings and other customizations you are used to on your own PC.
If you are going to be using Dreamweaver on a regular basis you may want to consider purchasing a copy for your own PC. It is available from DoIT.
Setting Up
We'll start by setting up all the files and folders we're going to use in this tutorial. Most of the time you'll do your file management through Dreamweaver, including putting files on the web server itself. Your web folder on the server already exists. It's called PUBLIC_web and is in your Linux home directory, also known as the Z: drive.
Creating a Local Folder
Dreamweaver allows you to set up a separate folder where you can work on pages before publishing them to the world. Normally the best place is in your Windows Network home directory. Using Windows Explorer (or your favorite way of working with files) make a folder in the U: drive called Web Site. We're going to want some files we can play with later, so go to X:\SSCC Tutorials\Web Class and copy everything in this directory to your new Web Site folder.
Defining Your Site in Dreamweaver
Now we're ready to start up Dreamweaver (find it by clicking Start, Programs). The first step will be to define your web site. You can use Dreamweaver to edit individual pages, but many of the best features will only be available in the context of a defined site. Setting up a site can be a bit confusing, but it only has to be done once.
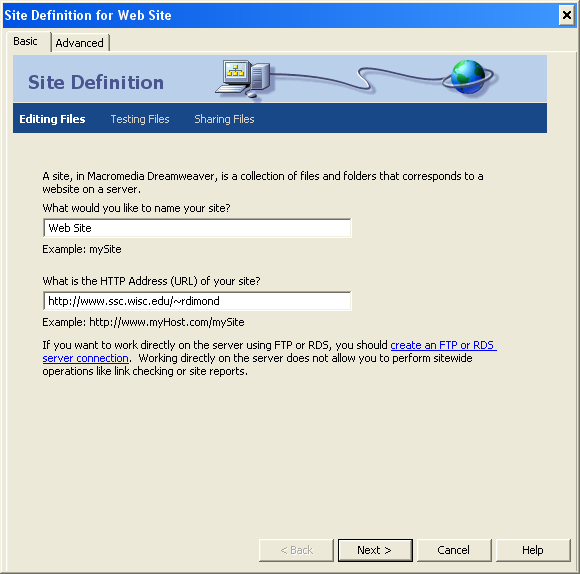
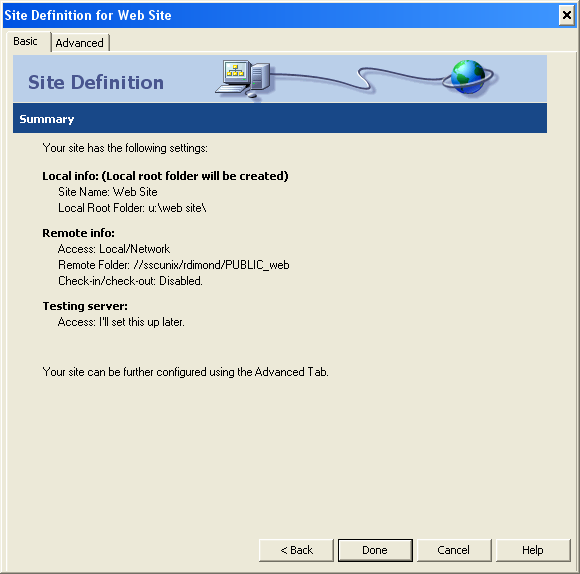
To begin, click Site, New Site. Enter a name in the box under What would you like to name your site? This name is for your reference only, so you can put it anything you like. Under What is the HTTP Address (URL) of your site, enter https://www.ssc.wisc.edu/~ followed by your SSCC username (e.g. https://www.ssc.wisc.edu/~rdimond). Then click Next.
The next screen asks if you'll be using some sort of programming language on the server. Choose No and click Next.

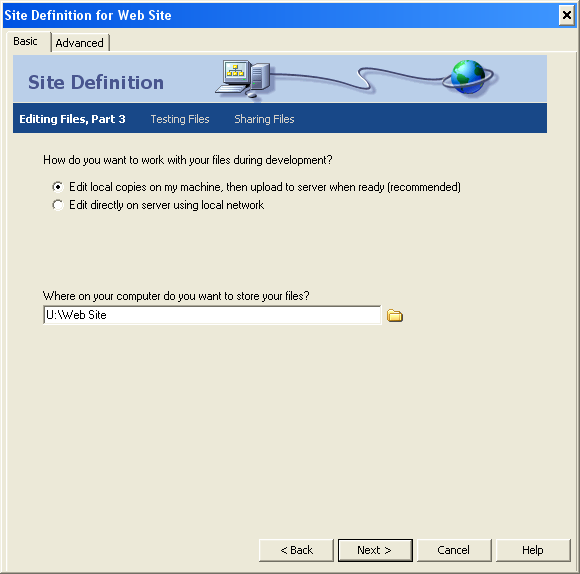
Next you'll tell Dreamweaver where to store the "local" copy of your files. Make sure Edit local copies on my machine, then upload to server when ready is selected, and then under Where on your computer do you want to store your files? type the directory you set up earlier, U:\Web Site.
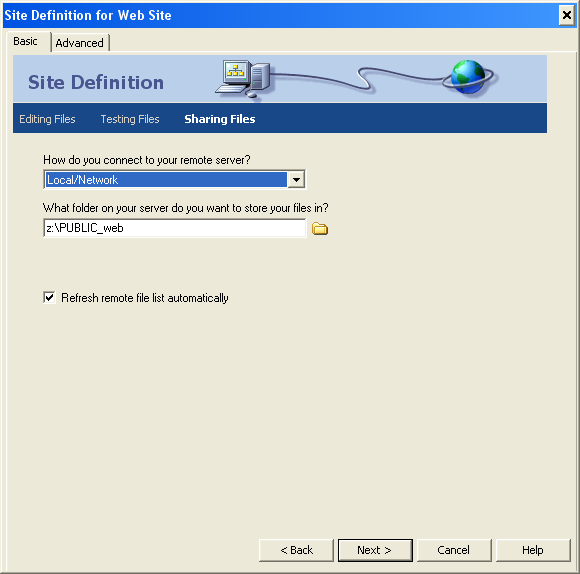
Now you'll tell Dreamweaver where to put files that are ready to be published on the web server. Set How do you connect to your remote server? to Local/Network. Under What folder on your server do you want to store your files in? type z:\PUBLIC_web.
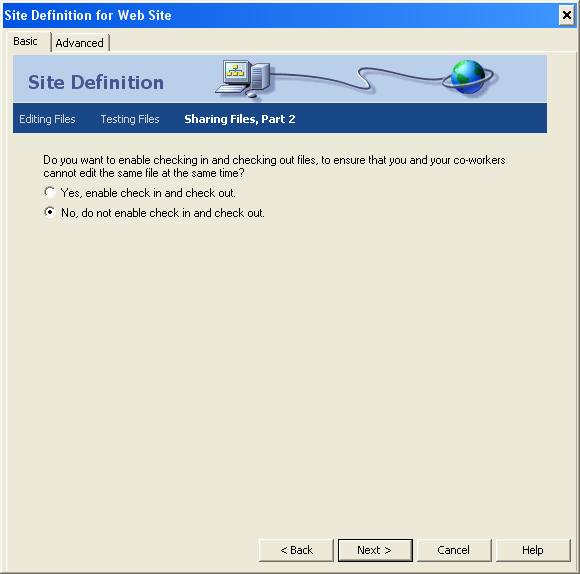
Dreamweaver will then ask if you want to enable checking in and out files. You might want to turn this on if there are lots of people who work on the site, but for your own pages choose No.
The last screen just confirms the information you've entered. Look it over, and if everything is okay click Done. If not, click Back until you get to the relevant screen and make corrections.
Saving Your Site Definition
Unfortunately Dreamweaver on Winstat has a problem where it occasionally drops site definitions. (Winstat, being a Windows Terminal Server, is not quite like a regular Windows PC and this is one case that causes trouble.) However, you can save your site definition as a file which you can load in case this happens to you.
Click Site, Manage Sites, make sure your web site is selected, and then click Export and Save. This will save the site definition file in your local web directory.
If Dreamweaver does drop your site definition, you'll probably notice when you can no longer put files on the web server (since Dreamweaver doesn't know where to put them). At that point you should click Site, Manage Sites, Import and select the site definition file. You'll then be back to normal.
The Dreamweaver Workspace
Dreamweaver has a tendency to make too much available at once (one suspects they wanted to impress people who are evaluating the program with how much it can do). Fortunately you can close the panels you don't need. The panels you're most likely to need are Files, Properties, and CSS. To close the others, right-click on their names and choose Close panel group. This would leave you with the following layout:
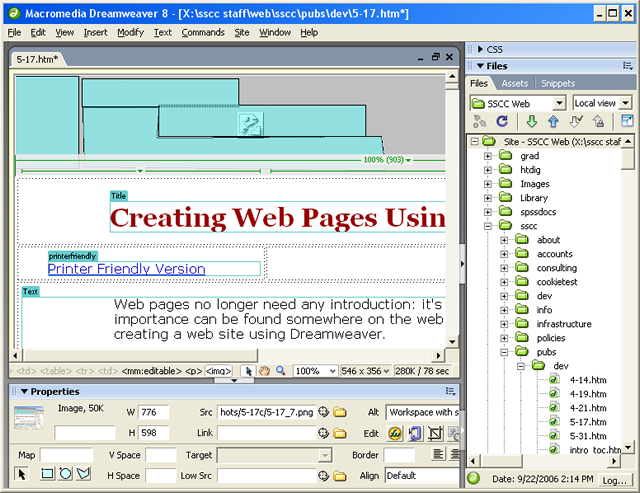
Note that this picture is not of a full screen--you'll probably have much more room. But as you're writing you may want even more. Just press F4 to make the document fill the entire Dreamweaver window. Alternatively you can click the small black triangles between the document and the panels at the right and bottom to close them temporarily. Click the arrows again to get the panels back. You can also control what panels you see by clicking on Window at the top.
Your Home Page
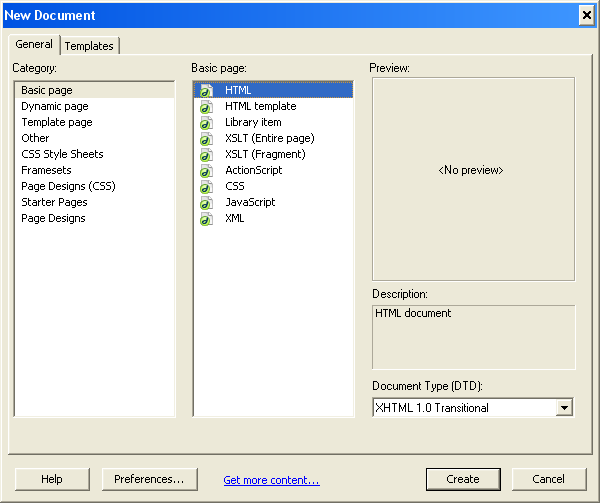
At long last, let's make a web page. Click File, New. Then choose the Basic page category and HTML, then click Create.
You'll get a blank page. Dreamweaver will have an easier time creating links if it knows where this file will be, so let's save it right away. Click File, Save as, and give it the name home.htm. If someone goes to your web site but does not specify what page they want they'll be given home.htm if it exists, so that makes a logical starting point.
Page Title
The first thing we'll do is set a title for the page. This is what will show up in the title bar of the user's browser while they're looking at the page. Leaving the page title set to "Untitled Document" makes the reader think "newbie web author."
Make sure the Properties pane is open at the bottom of your screen. Then make sure it's set to full size by clicking on the small triangle in the lower right. Then you should see a button labeled Page Properties.
Click on it, and you'll get a new window with a variety of settings. Select the Title/Encoding category. In the Title box, type a title for the page--something like "<Your Name>'s Home Page." Ignore the other settings for now and click OK.
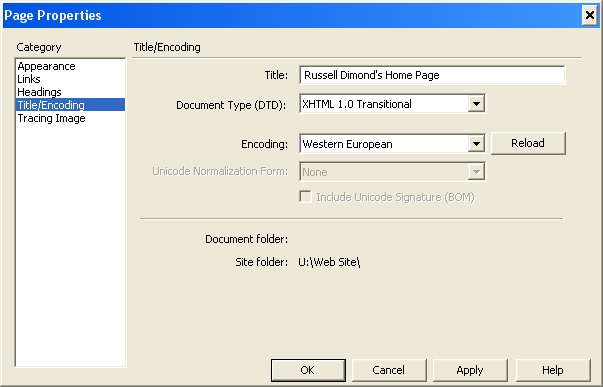
This window also allows you to control many aspects of the appearance of your page. We're not talking about controlling appearance right now, and when we do we'll do it a bit more directly. But you may want to make a note of this window for future use.
Text and Headings
Let's start with just some text. Type in <Your Name>'s Home Page. As you see the text appears on the page just as if you were working in Word. You may be tempted at this point to change the appearance of these words--to make them bigger or something. But before you reach for the Size menu on the Properties panel, ask yourself why you think these words ought to be bigger.
The reason (translated into HTML terms) is that they are a heading, specifically a level one heading. You can mark them as such by selecting the words, then going to the Properties panel and setting Format to Heading 1. Note that Dreamweaver immediately made the words big and bold, and this is what a standard web browser will do as well. However, non-standard browsers will also find a way to tell the reader that this is a heading, ways that may have nothing to do with size or font.
Recall that the HTML "tag" for a level one heading is <h1>. If you look in the lower left corner of the document window, you'll see <body><h1> in the border of the window (if you don't see the <h1> make sure the cursor is somewhere in the heading of the page). This shows the tags that apply at the current location of the cursor. This is a great way to learn HTML, and once you know some HTML it's a great way to see how Dreamweaver is turning your ideas into HTML.
Images
It's almost too simple to put images in a web page. It's easy when you are on campus with a direct connection to the Internet to ignore how big your pictures are and how long it will take for them to download. But let's do it anyway.
Move the cursor to a new line and either press CRTL-ALT-i or click Insert, Image. Then select uwlogo.gif. You'll immediately be asked to set the Alternate text. Type in University of Wisconsin-Madison and click OK.

This is perhaps the most important thing you can do to make your page accessible to people with disabilities, so it deserves some explanation. The Alternate text is what a browser will display if it cannot display the image itself. It could be a simple as the user turning off images to save loading time, or it could be that the user is blind and the page is being read to them. Alternate texts must be short, so if you need to give a longer description you'd put it in a separate web page and put the URL of that web page in Long description. This is rarely necessary--normally you'd only do this if a graph or diagram is a critical part of the information you're trying to convey.
The alternate text for this image was a no-brainer, since the image is just a picture of text in a particular format. In general choosing good alternate texts is an art form, but the basic principle is to convey the same information that the image is trying to convey. Do not attempt to describe what the image looks like. Someone who is blind doesn't care that in our image the words are red!
If an image is purely decorative, click the drop-down menu to the right and choose <empty>. Keep in mind that screen reader programs cannot skip ahead the way a sighted reader can, so hearing "Picture of the Sewell Social Sciences Building on a sunny day with a few puffy clouds and the Carillon tower visible in the foreground" every time they load your page probably won't be appreciated. Graphical layouts containing dozens of tiny images with the alternative text of "Spacer" are even worse. On the other hand, setting the alternate text to <empty> is very different from not setting it at all. One says "this image conveys no important information." The other says "I really didn't pay any attention to accessibility issues, so for all you know this entire page is useless if you can't see this image."
At the bottom of the screen there is a little box that says how big your page is and how long it will take to download on a 28.8 modem. This is a conservative estimate of how long it would take someone to download your page at home on a dial-up connection. People with cable or DSL, or who are on campus, will be able to download it much more quickly. Thus "how big is too big?" depends on your intended audience. If you do decide that your page is bigger than you want it to be, focus on the images. A picture may be worth a thousand words, but a thousand words will download much more quickly.
Links
The whole point of the web is to link information together in logical ways. So let's learn how to make links. Let's pretend you are teaching a course and want to make a link on your home page to the course calendar. We'll make a new section by pressing CTRL-2 (level two heading) and typing Teaching. Note how the level two heading is a subsection of the level one heading (your home page). Now go to the next line and type Course Calendar.
There are many ways to turn text into a link, but they all start by selecting the text. Then you can:
- Type the name of the web page you want to link to in the Link box of the Properties panel
- Drag the small circle to the right of the Link box to the file in the File panel you want to link to
- Click Modify, Make Link or press CTRL-l, then select the file you want to link to
If you plan ahead, you can insert both the text and the link at the same time by clicking Insert, Hyperlink. If you do, note that the only boxes you'll usually fill out are Text (the text the user will read) and Link, the file you're linking to.
In this case what we want to link to is calendar.htm, so choose one of the methods above and make Course Calendar a link to it. You'll know it worked when the words are blue and underlined.
By default Dreamweaver will use what are known as document-relative links, and normally that's what you want. If the link just says calendar.htm that means the server should look for a file with that name in the same directory as the file you're currently reading. The advantage to this approach is that you can pick up the whole web site, move it somewhere else, and all the links will still work.
Now let's add a research section. Create a level two heading called Research and under it type Data. Make that a link to the file data.dta, and just for fun use a different method than the one you used before.
You may be wondering what kind of data this is and how someone is going to be able to read it. These are excellent questions. You can put any kind of file you want on the web, but consider ahead of time whether your intended audience will be able to do anything with it. For example, data.dta is a Stata data set, and only people who have Stata on their computers will be able to open it. And while Stata is pretty well-behaved, the data files of other programs may be unreadable by different versions of the same program or the same program running on different types of computers. You're usually safe in assuming that everyone has or can get Adobe Reader and can thus read PDF files. Most people have programs that can read Word and Excel files (notably, Word and Excel). But before you put anything but web pages on the web, find out as much as you can about your intended audience and what they have available, experiment, and plan ahead. There is nothing more frustrating than rushing to meet a deadline and suddenly realizing your collaborators can't read the files you're trying to share with them.
Now let's link to something outside your web site. Since it is outside your site, you need to tell the reader's browser exactly how to find it, right down to the protocol (normally http). If you know the URL of the page you are linking to you can type it in the Link box of the Properties panel, but that's asking for typos. You can avoid that by first finding the page you want in a web browser, then copying the address from the browser and pasting it into Dreamweaver. That way you know it's correct.
Open a web browser and go to the SSCC's home page (http://ssc.wisc.edu/). Copy the tables of the address bar and then switch back to Dreamweaver. At the end of your web page type The host of this web site (this is an exercise--there's no need to put this link in an actual web page even if it is hosted on the SSCC's web server). Select that text, click inside the Link box in the Properties panel so that the cursor is there, and then either right-click and choose Paste or press CTRL-v. The URL you pasted should appear in the Link box and the text will turn into a link to the SSCC home page.
Note that we did not use the Make Link dialog box to do this--it doesn't like addresses that don't include a specific file.
Email Links
When the reader clicks on an email link, the browser attempts to open the default mail program on their computer, then creates a message addressed to the address in the link. Thus email links provide a very simple way for your audience to contact you.
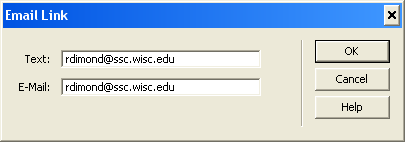
The University Accessibility Policy requires that every web page name a person to contact if someone cannot access the page, so we'll fulfill that requirement and learn to make an email link at the same time. Type If you have trouble accessing this page, please contact: {your name} ({your email address}). Select your email address and click Insert, Email Link. Since the text you selected is an email address, Dreamweaver will cleverly deduce that that's the address you want to the reader to send mail to when they click on it.
So why didn't we just make your name the link? Not everyone uses an email program that communicates with a browser. They'll need to enter your email address themselves, so you need to put it in the text where they can read it.
Named Anchors
Our page isn't really long enough to need this yet, but let's put in a link that takes us back to the top of the page. At the very bottom type Back to Top. Select it and in the Link box type #Top. This will take us to an anchor called Top within this document. Think of an anchor as a bookmark, except it must be placed by the author.
All we need now is an anchor called Top. Move the cursor to the very beginning of the document, then click on Insert, Named Anchor (or you can press CTRL-ALT-A). You'll get the following:
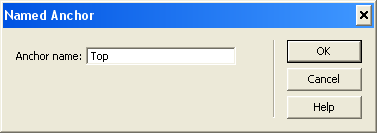
Type Top for the Anchor Name. You'll see a yellow thing with an anchor on it to the left of your title. Rest assured it will not be visible when viewed in a browser. But when the user clicks on the Back to Top link, the browser will jump to this anchor.
Navigation Bars
One very useful feature for almost any web site is a navigation bar which allows quick access to the most important pages on your site. See the SSCC Home Page for an example (the stuff on the left). Once your web site has more than one page in it, consider putting together a navigation bar so readers can get to all of them. A navigation bar is just a list of links. The challenging part is seeing your web site from the point of view of the reader and helping them get to what they're looking for quickly and easily.
Lists
Lists are a very common structure in documents, and HTML handles them very easily. Let's make the link under Teaching the beginning of an official list of links. First select the link text Course Calendar. Now under Text on the menu bar select List and then Unordered List. This will create a bullet list, while an Ordered list will be numbered. If you are in a list element and hit ENTER, Dreamweaver will automatically create a new list element for you--just be sure you don't have text selected, or you'll replace it instead. Keep in mind that lists are structural markup. They should be used for actual lists, not just to get indentation or other presentational effects.
Tables
Tables were included in HTML so people could put tables of data in web pages. However, people rapidly figured out that you could use a table to control the layout of your web page. This is definitely a case of using structural markup for presentational purposes, but the alternative (positioning by CSS) is a lot harder to do and much less reliable. Poorly designed layout tables can wreak havoc with screen readers and other browsers that can only deal with a small part of the page at a time. But if you're aware of the issues it's easy to create tables which will work just fine.
Our web page is getting a bit long, but there's plenty of blank space on the right side. Let's move the Teaching section and the Research section into two parallel columns. Put the cursor just above Teaching and click on Insert, then Table. You'll see the following:
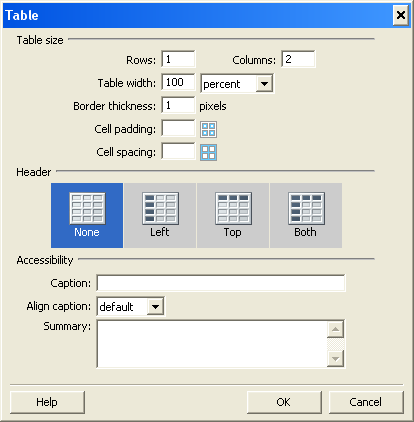
We want one row (why in a moment) and two columns. We'll adjust the width later so it doesn't really matter what you set it to for now. We want a border on our table, but if you didn't you could set Border thickness to 0.
The accessibility features are mostly intended for data tables. The structure of a data tables can be hard to understand if you cannot see the entire table at once. Use the captions and summaries to explain that structure. However, for layout tables, like we're doing, there's usually nothing to summarize.
Now drag the entire Teaching section into the left table cell, and the entire Research section into the right table cell. Of course it's usually more efficient to make the table first and then make the stuff that will go inside it.
Now that the table is in place, you can decide if you like the look of it. If not, click on <table> in the bottom border of the document window. Then the Properties panel will show the properties of the table.
The table width is in the box marked W. This can be measured either in pixels or percents. Using percents is highly recommended, as screen sizes vary. Try 70% for this table. Alternatively you can delete everything in that box and let the browser decide--it will choose a width just big enough to fit everything in the table. This makes for a very flexible design.
Cell padding (CellPad) will leave some space around the text in the tables, making them easier to read and less cluttered-looking. Try 10 to see the effect.
You can adjust the column widths simply by dragging the column border. If the table width is measured in percentages the column widths will be too.
To adjust parts of the table it helps to know what HTML calls them. The <tr> tag stands for "table row" while <td> is "table data" or a single cell. Thus to adjust a particular cell, click inside that cell and then click the <td> tag at the bottom of the screen to see the properties of the cell itself.
You'll often finding yourself changing the alignment of individual cells. Horz and Vert control the horizontal and vertical alignment respectively of the text within the cell. To see it in action, add some blank lines to one cell so it's now longer than the other. You'll notice that the Teaching and Research headings no longer line up. That's because the default is to center them within the cell, so as the cells got taller, the text in the cell with less table moved down. You can fix that by setting Vert to Top for both cells--that way they'll both start at the top regardless of their relative sizes.
Given that our sections consist of rows of text, you might think it would make sense to make a table with multiple rows. If you set the borders properly you could even make it look identical. But to a screen reader, the result would be completely different. Screen readers read tables from left to right and then top to bottom. Thus it reads an entire row before moving to the next one. The way we made this table it will read Teaching...Course Calendar...Research...Data, which makes sense. If we had put the second row of text on a separate row in the table it would read Teaching...Research...Course Calendar...Data, which makes no sense at all. It's easy to make tables which look fine to a sighted reader but are nonsensical when read by a screen reader. On the other hand, it's also easy to read your table left to right, top to bottom, and make sure that it makes sense when read that way.
Publishing Your Page
When we defined your web site we gave Dreamweaver two locations: one on the web server, and one in your Windows home directory. When you click File, Save, you will be saving the document in your home directory. Before others can see it you need to publish it to the server. To do that, you can:
- Press CTRL-SHIFT-U
- Click Site, Put on the menu bar at the top
- Right-click on the file in the Files panel and choose Put
Since you're working with computers, nothing is done until it's tested. Start up a web browser and type in www.ssc.wisc.edu/~<your login name>. You should be able to see your new home page. Look it over, try out the links, see if everything works as you expected. If not, go back to Dreamweaver and try to fix it. Make sure you did everything just as described. When you click on the Data link, the browser will probably ask you if you want to save the file to disk. That's because unless you have Stata, your computer will have no idea what else to do with data.dta.
An alternative to putting files is to "synchronize" your entire site. Synchronization asks Dreamwever to identify any files which need to be uploaded to the server and do so automatically. You can do this by clicking the two circular arows at the top of the Files panel or by clicking Site, Synchronize Sitewide. There's just one catch with synchronization: since Windows and Linux handle time differently, all synchronization information gets scrambled at the begining and end of Daylight Savings Time. The simplest (but slowest) solution is to put your entire site right after the time change, so all the synchronization information is updated. For alternatives see Adobe's TechNote on the issue. Synchronize is mostly useful if you have a large site with lots of non-HTML files like PDFs of papers.
Templates
As you move beyond making a web page and begin to develop a web site, there will probably be things that should be the same on every page. University policy requires you put contact information on every page, you'll almost certainly want a navigation bar, and you probably want to give all your pages a similar layout. Even if you're not concerned about establishing an "identity" for your site, making web web pages is quicker and easier if you reuse components.
Dreamweaver templates allow you to set up a starter page with all the common elements already in place, and then you can simply add in the the table that makes each individual page unique. Even better, if you decide to change the template Dreamweaver will automatically update all the pages based on that template. Consider changing the name of a web page that your navigation bar links to. Without templates, you'd have to change the link in all your pages one by one. With them, you simply change the template and you're done. Nor are templates limited to navigation bars: the SSCC recently gave our web site a complete graphical makeover but thanks to templates, the task of converting all the individual pages to the new layout took about 15 minutes.
Creating a Template
To create a template you start by creating a regular web page--in fact it's quite common to first make a page and then say "I like that--I want all my pages to look like this one." We'll use our sample home page to illustrate. Click File, Save as Template. You'll be given the opportunity to give a description of the template and to name the resulting file something other than home, but don't bother. Do allow Dreamweaver to update links.
Several things will happen. First, Dreamweaver will automatically create a folder called Templates in the root of your local site. This isn't meant to go on the server or to be visible to anyone but you. Second, the file you have open will now be called home.dwt (dwt standing for Dreamweaver template) rather than home.htm, though home.htm is still there on the disk. Third, the file is automatically saved in the Templates folder. Templates must be stored in the Templates folder or Dreamweaver won't find them.
Next we need to decide what we want to be the same on all our pages, and what we want to be different. Let's leave the title and the links at the bottom the same, but the part where the table is now will be different. To do that, go ahead and delete the entire table. Then, leaving the cursor there, click Insert, Template Objects, Editable Region. You'll be asked to give the editable region a name. Type in Content, as this region will contain the actual table of the page.
Templates can contain many editable regions, but one will do for our purposes. Save the template, and then we'll make a page based on it.
Using a Template
To create a new page based on a template, click File, New. Then choose the Template tab, select the home template, and click Create.

A new page will appear with all the common elements already in place. In fact if you try to change them Dreamweaver won't let you. What you can edit are the editable regions, in our case what's in the Content box we just created. Go ahead and put some random text in that box, then save the page as templatetest.htm.
Editing a Template
You've seen how templates can save you time when you create new pages. Now let's see how they make it easy to change your entire web site. It doesn't make much sense to have all your pages claim to be your home page in the title. So go back to the template (home.dwt) and change {your name's} Home Page to {your name's} Web Site. Now click File, Save. You'll notice it takes a little longer than you might expect. But now switch back to templatetest.htm: you'll see that the title has already been changed to match the new template. It would have been just as easy (though it would have taken longer) if you had had a hundred pages in your web site.
Cascading Style Sheets
The purpose of HTML is to tell the reader's web browser about the structure of your document. Cascading Style Sheets (CSS) tell the browser what you want it to look like. CSS allows you to define "classes" (or styles) and then apply those styles to pieces of text. Alternatively you can define the way standard HTML tags (<h1> for example) are displayed.
There are three places you can put CSS: in an external style sheet which can then be linked to many web pages, at the beginning of a web page so it applies to all of that page, or in an individual tag so it applies to just that tag. The "cascading" part of CSS means that the closest tag will take precedence. If you start using the various tools in Dreamweaver to control appearance Dreamweaver will insert CSS in the page or tag as needed. But we're going to focus on creating an external style sheet which you can use for many pages. That way, like with a template, changes to the style sheet carry over to all the pages in your web site.
Using a Style Sheet
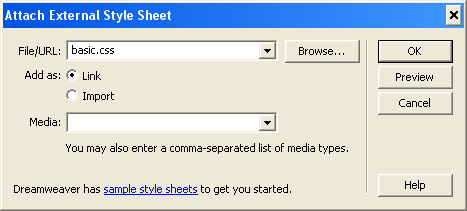
We'll start by learning to use styles which have already been defined. Shrink the File panel and expand the CSS panel by clicking on the small triangles next to their names. Near the bottom of the panel is a small icon of two chain links--click on it to link in an external style sheet. Click Browse and choose basic.css, a style sheet with a few basic styles in it.
You'll see that the CSS panel now has some styles in it. These are the styles defined in basic.css, and you can now use any of them in your page.
As an example, let's put the "boilerplate" contact information line in italics. Select that entire line, then in the Properties panel click on the small triangle by Style. This will give you a list of the styles you have available. Choose Italic, and the text you selected will be shown in italics.
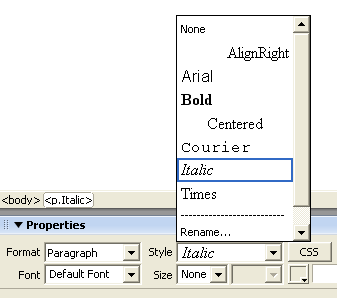
Now let's put the email address itself in bold. Select the address, then choose Bold. Note how the text is both bold and italic: that's because we applied italic to the entire paragraph.
Creating New Styles
Now let's create a style of our own. At the bottom of the CSS panel is a piece of paper with a plus sign over it. This allows you to add new styles to the style sheet. To start with, let's define a style that turns text red. First click the plus sign. Then set Selector Type to Class, and for the name type in red. Make sure Define in is set to basic.css, so the style goes into the external style sheet rather than just this web page.
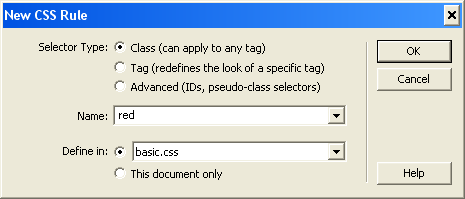
By making this a class, we're creating a style which we can apply at will, just like the Italic and Bold style we've used already. We'll look at the other options shortly.
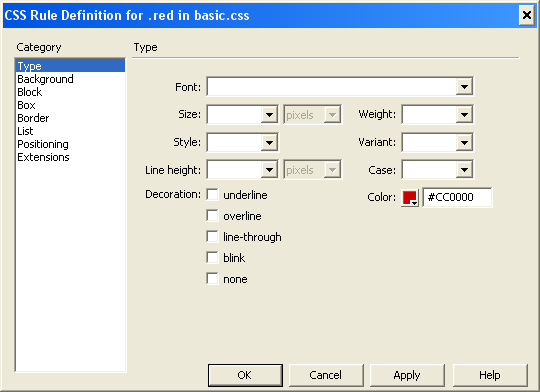
Click OK, and you'll get to define what this style does. The number of options here is overwhelming, but let's just stick with setting the color for now. Click on the little box next to Color and the color selector window will appear. The classic "red" is on the far left side, but I find it's a little light for easy reading and would actually suggest something a bit darker. Whatever you choose, Dreamweaver will automatically translate that into an RGB (Red, Green Blue) code (my slightly darker red is #CC0000). Click OK, and your style is ready for use. Apply it to something to see it in action.
Up to this point, all the styles we've used have been named for their effect: red, italic, or bold. In practice, I'd suggest creating styles based on what they'll be used for. For example, this document includes one style for things that appear on your screen and another for things that you type. In a way, you're creating your own structural markup. In your sample home page, you might want to create a style specifically for the contact information line. That way, if you decide that you want that line to be set off by being in a different font rather than by being in italics, you can just change the style without worrying about everything else you've put in italics.
Changing the Appearance of HTML Tags
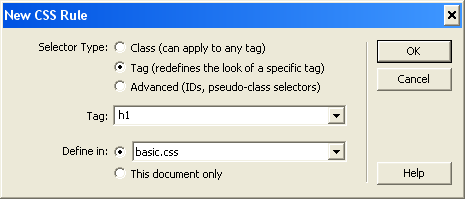
Given that you're going to mark up your web pages with HTML tags anyway, one of the easiest ways to control the appearance of the page is to control what those HTML tags look like. Let's start by changing the title of our page, which is marked as <h1> (level one heading).
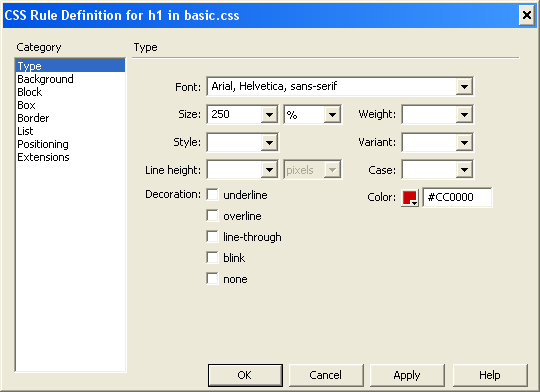
Click on the plus sign again, but this time set Selector Type to Tag. In Tag, type or select h1.
We'll be a bit more ambitious this time. Set Font to Arial, Helvetica, sans-serif. Different browsers running on different computers may have different fonts available, so this means Arial is the first choice, Helvetica is the second, and neither are available then use any generic sans-serif font.
Set Size to 250%. You can set font sizes using points, which is probably more familiar. But if you do, the reader is stuck with your font sizes. If the reader has poor vision, for example, and would like to increase the size of all the text on the page, setting font sizes in points prevents them from doing so. However, 250% means "2.5 times the size of the default." Thus if the reader increases their default text size, your level one headings will scale accordingly.
Finally, choose a color. But don't click OK yet--we're going to move beyond the Type category.
Now go to the Block category on the left and set Text align to center. A "block" tag in HTML always comes on its own line. Examples include paragraphs and headings. Certain styles only make sense in the context of a block, including center (what would it mean to center half of a line of text?) and those styles are found in the Block category.
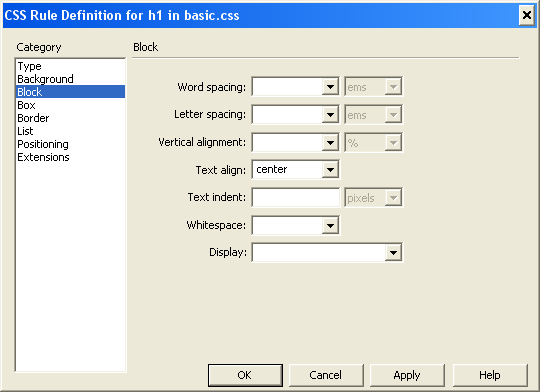
Click OK and you'll see that your page title changes immediately. Since it's already marked as a level one heading, the style for level one headings was applied to it automatically.
There are many, many things you can do with CSS. Feel free to just poke around the various categories, try things out, and see how they work. There's just one caveat: some of the more esoteric CSS properties are not supported by all browsers, and some are not supported by any current browser.
Next Steps
Now that you've got a basic understanding of Dreamweaver and web pages, what should you do next? The first step should probably be to remove the test pages you created from the web server so they aren't available to the world--Google will find them eventually (it's fine to leave them on your local site). Go to the File panel, and change Local view in the top right to Remote view. You're now looking at what's on the web server. Go ahead and delete all the files.
Next, take a step back and think about your future web site as a whole. What information do you have to share? What categories does that information fall into? Who will be coming to read it? How can you organize it so they can easily find what they need? How many pages will you need? How will they be linked?
Then start thinking about the design of the individual pages. Can they all have the same layout? If you'll be including a navigation bar (and you probably should) where will it be? On the left? At the top and/or bottom? Here's where you may want to look at other pages, especially those with similar goals to yours, and see what you like and don't like about them.
Once you have an idea of the page layout you want, start building a template that implements it. As you do, create a style sheet to give it the look you want. Then, when the template is ready, start making individual pages based on it.
Of course you're not likely to get it exactly right the first time. That's why templates and external style sheets are so useful: as you identify problems with your site design, you can easily go back and make changes to them, and those changes will be applied to the entire site.
If you run into problems, from links that don't work to things that just don't look right, feel free to ask the SSCC Help Desk for assistance. We can't make web pages for you, but we're happy to help you make them work.
Last Revised: 8/05/2009