R for Researchers: Projects
April 2015
This article is part of the R for Researchers series. For a list of topics covered by this series, see the Introduction article. If you're new to R we highly recommend reading the articles in order.
Overview
This article will introduce you to RStudio, a programming environment for writing R code, and Git, a version control program. These tools will help you work more efficiently and enhance reproducibility.
RStudio provides an integrated development environment (IDE) for R users. This IDE provides support for project organization, source control, and document generation. While RStudio can work with individual files which are not in a project, you will likely find it quicker to develop R code using projects.
Git tracks all the changes made to an R project and allows you to switch between versions at will. Git allows you to reproduce your research at prior states, which is an important part of reproducible research. RStudio's has integrated support for Git with projects.
RStudio, Projects, and Git work together to provide an efficient and reproducible development environment. Their use is integrated into this article series.
Preliminaries
You will get the most from this article if you follow along with the examples in RStudio. Working the exercises will further enhance your skills with the material.
Running RStudio
RStudio is started on Winstat, or another Windows computer, similarly to other programs.
We will start RStudio now.
Click the Windows logo button in the lower left corner of the screen.
From the menu select All Programs. Then select the RStudio folder. Then select the RStudio program.
The navigation to this program is displayed in the following image.
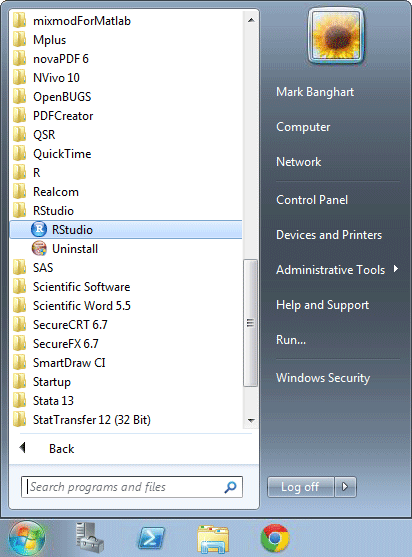
RStudio Start screen
RStudio window
The RStudio Window is divided into panes. There are four panes which can be displayed in RStudio's window. The top left pane may not be displayed in your window.
RStudio's window with four panes displayed.
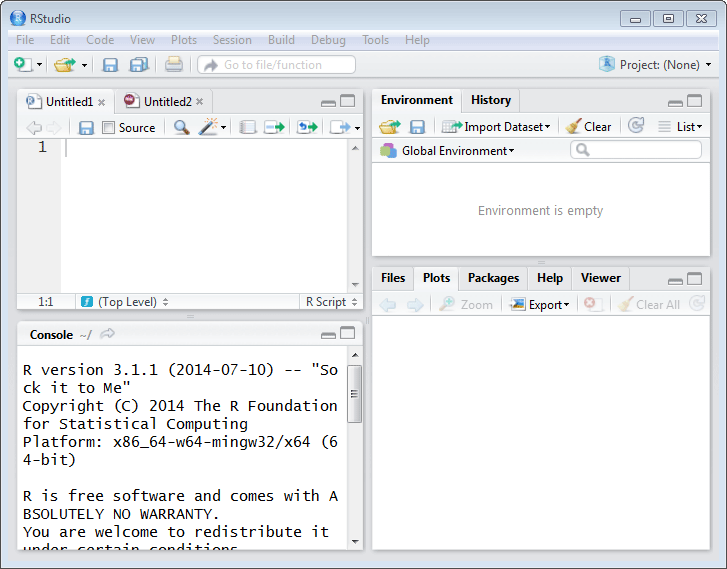
RStudio IDE screen
The source pane is on the left side on top. This is where you will write and edit your R programs and documents. The pane will have a tab for each open file. Here there are two files opened, Untitled1 and Untitled2. This pane is only present if there are files opened in the editor.
The Console pane is on the left side on the bottom. This is where results are displayed. The console tab is opened when RStudio is opened. Additional tabs are opened if another program type is used, such as an R markdown file. This pane might be full height on the left side if no file is open in the source pane.
There are two Tab panes on the right side, one on top and the other on the bottom. These panes contains tabs which allow quick access to additional tools. The tabs are for the following functions.
- Environment displays data objects defined in the current R session.
- History is a list of prior commands which have been executed.
- Git is used for version control.
- Files is a folder browser.
- Plots displays plots you create.
- Packages is where packages can be installed and loaded from.
- Help is where help on R commands can be found.
- Viewer is where web content can be viewed. This series will not cover the use of the viewer.
The location of the four panes within the window can be changed using the Pane Layout window. This window is accessed by selecting Global Options from the Tools drop down menu. The tool tabs can be moved between the two tab panes using this window as well.
The size of the panes can be adjusted by moving the grey lines which separate the four panes. The panes can be minimized or maximized using the icons on the right side of the grey bar at the the top of each pane.
Git integration with RStudio
RStudio provides integrated support for several version control programs. The SSCC recommends the use of Git for version control with RStudio. This article and the other articles in this series will use Git for version control. If you do not have Git installed on your computer, you will need to do that now. See the Introduction article for more information on installing Git.
RStudio must be configured to work with the Git software. If you are on Winstat or using one of the SSCC's lab computers, RStudio has been configured to use Git for version control for you. If you are running RStudio on another computer, you need to confirm RStudio is configured for Git.
From the Tools menu (which is along the top of the RStudio window), select Global Options.
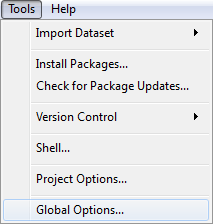
IDE Tools menu
An Options window will open. From the Options window's left menu, select Git/SVN.

IDE Global Options
If the Git executable: box does not have a path to git.exe, use the browse button to locate git.exe and set the path.
Confirm that the Enable version control interface for RStudio projects box is checked.
Click the OK button at the bottom left in the Option's window.
RStudio is now configured to support version control.
Projects
A project in RStudio is a collection of work organized in a work folder. RStudio provides tools that will help you manage your work on projects. RStudio remembers what files you had open and what tabs were displayed, when you close a project. When you open the project again, RStudio will open the same files and display the same tabs. This will allow you to quickly pick up your work again. RStudio can be configured to save and restore the session memory. The default is to start a new session when you open a project, so some previously executed commands may need to be run again.
Almost any R work can be structured as a project. You might consider creating a project for an individual class, thesis, or research project.
We will create a project to organize the work for the article examples and exercises in the RFR series.
From the file menu (which is along the top of the RStudio window), select New Project.
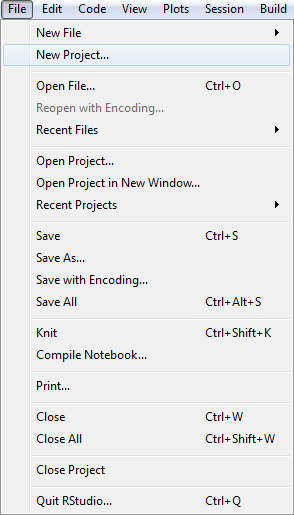
IDE Existing Project
A New Project window will be opened with three options for creating a new project. We will use a new directory for this project, so select the New Directory icon.
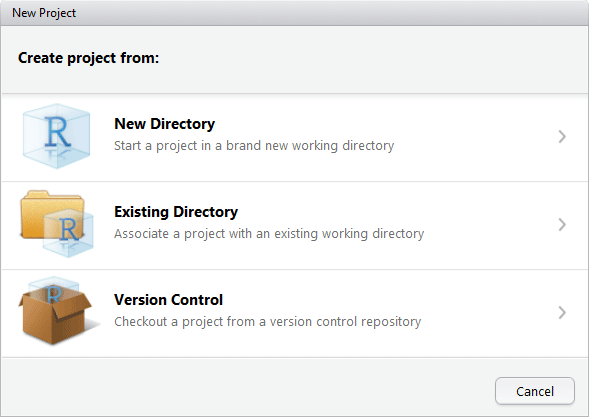
IDE New Project menu
The menu in the New Project window will now display options for the type of project to start. We are starting an empty project, select the Empty project icon.

IDE New Project new directory
The New Project menu will change again. We will use RFR for the project name, enter this in the Directory name: dialog box. Use the Browse button to navigate to the folder in which the new project will be started. We will put this project on our U drive. If you are working on a computer without a U drive, you can use your Documents folder instead.
Important: Confirm that the Create a git repository button is checked.
IDE New Project done
Click the Create Project button when you have completed these steps.
Confirm that you have a tab labeled Git in one of RStudio's tab panes.
The option to create a project in an existing directory is used when R programs have already been written and saved in a directory. To do this, you would open the New Project window as was done above. You would select Existing Directory from the menu in the New Project window instead of New Directory option. This will create the RStudio project (the .Rproj file), but does not set up source control for this project. You will need to use a Git GUI to setting up source control for this project.
The Version Control option is used to start a local project folder from an existing project, provided the existing project is using Git. This is often a project which is shared by researchers. We will create a project using the version control option in the Central repositories section of the R Scripts article.
Opening an existing project is also done from the File menu.
From the file menu in RStudio, select Open Project or Open Project in New Window.
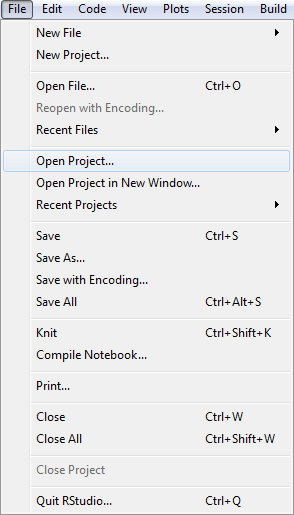
IDE Open Project
An Open Project window will be displayed. Navigate to the project folder. Select the file with extension .Rproj.
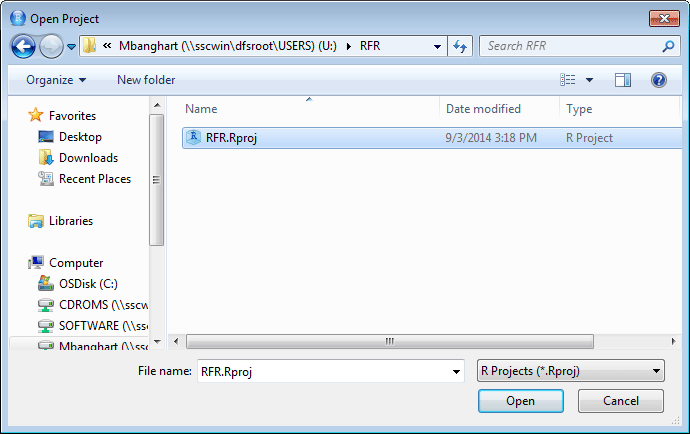
IDE Open Project done
Click open.
The project will be opened with the source files you had open when the project was closed.
Exercise
- Open the RFR project you have just created in a new window. Do this from the RStudio window you currently have open. After you have been able to open the RFR project in a new window, close it as it is not needed for the remaining exercises of this article.
Organizing project files in folders
If your project is small, keeping all your files in the one project folder created by RStudio is convenient. For larger projects with multiple documents, scripts, figures, etc., using subfolders to organize your work will make life easier.
Some suggestions for organizing folders within a project.
- Create a sub-folder for your original data
- Use a sub-folder for cleaned-up data
- Use a sub-folder for your scripts
- Use a folder for each document
- Use a folder if you need to save figures
- Use relative paths to reference files. Examples of relative paths are ..\DataProc\DataSet.R to read a data file from an R script or ..\code\Analysis.R to reference a script from an R Markdown file in its own folder.
Git version control
Many of us have saved a copy of file we are about to make changes to. We do this just in case we need to go back to this prior version. Anyone who has ever saved a copy for later use will benefit from a version control system.
Git is the version control system the SSCC uses with RStudio. Git, like most version control systems, tracks changes made to files. Git's real advantage over other version control systems is its distributed nature. This allow any project member to work on the project anywhere, without being connect to the network.
A Git repository is where a project history is saved. The repository is contained in a hidden folder, called .git, in RStudio's project directory. This folder contains a collection of files and folders which Git uses to manage the project's history. You will not need to look inside the repository or be familiar with it's contents. Git manages all of the repository internals behind the scenes. You will do your version control through the RStudio user interface. RStudio's Git interface provides many of the common functions needed to do version control. If you find you need a Git function not supported by RStudio, you can open the Git project using a Git GUI by referencing the path to the .git repository.
RStudio's Git tab displays what has not been saved to the repository. You can think of this tab as your version control "to do" list.
Select the Git tab in RStudio. The following will be displayed in the pane.

Git Empty Repo
You will see two files in the window with question marks in a yellow box. A yellow box with the question marks inside indicate that the file has not been included in the Git repository.
The state of the project is saved with what is called a commit. A commit is done whenever your project is at a state you may wish to return to. This may be a major event such as saving an analysis that supports a paper you are submitting. It can also be minor events such as saving the current version before experimenting with a new approach to some code or analysis. Typically a commit is done whenever some additional functionality is added or repaired. Frequent commits provide more projects states in the project history, more points you can recover to. Too frequently committing makes it more difficult to find the state you want to recover to, though Git provides tools to help you manage project history and find changes in files. With some experience using Git, you will be able to determine the optimal commit points for your projects.
Commits are done at the file level. If a file is to be included in a commit, all changes made to that file since the last commit will be included in the commit. You control what is committed by determining which files will be included in the commit. This step of identifying the files to commit is called staging the files.
Version control practice is to save only source code files to the repository. This is why these systems are also called source control. Some common files not included in source control are:
- Any file which is generated from source code. These files can be be generated again, if lost or corrupted. Generated files include graphics, pdf files, and such.
- Data files are typically either static, not changing, or generated. The original data is expected to be static, any back up copy will be the same. Any reformatted data sets can be regenerated by the source code.
- Files containing information which does not influence results. An example is the RFR.Rproj file, as seen in the Git tab. It contains project status which would be recreated if the project state was restored.
Git ignore is used to identify files which you do not intend to include in source control. Ignoring a files removes it from the Git Status display, in the Git tab. This is removing it from the source control to do list. This makes it easier to see the files of interest.
We will ignore the RFR.Rproj file.
Select the RFR.Rproj file in the Git tab.
From the tools menu in the Git tab (the icon which looks like a gear or cog) select Ignore.
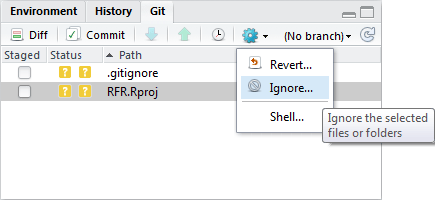
Git Ignore
A Git Ignore window will be displayed.

Git Ignore Save
Click save in the Git Ignore window.
The Git Ignore window will disappear and the RFR.Rproj file will no longer be displayed in the Git tab pane.
A branch is a series of commits, each of which is a change in the project from the prior commit. The progression of a project's development is recorded in a branch. Our repository does not have a branch as yet. This is indicated by "(No branch)" being displayed next to the tools icon (cog) in the Git tab. A branch is created with the first commit. The default branch name is Master, and it is what we will use in these articles.
We will commit the .gitignore file.
Select the Git tab in RStudio.
Click on the check box in the staged column for the .gitignore file. This stages the .gitignore file in RStudio.

Git Staged
The A in the green box indicates that this file is to be added to the list of files in source control. The file is now staged.
Click the commit icon in the Git tab.
A window opens with RStudio: Review Changes in the title. In the top left pane you will see the staged files. In the bottom pane you will see the changes in the staged files (changes from what was committed before.) If there were multiple files being committed, this lower pane would display the changes for the file that is selected in the top left pane.
Write a commit message in the commit message pane (top right pane.) We will use "Initial commit" for the message. This is a common message to use when initializing a repository.
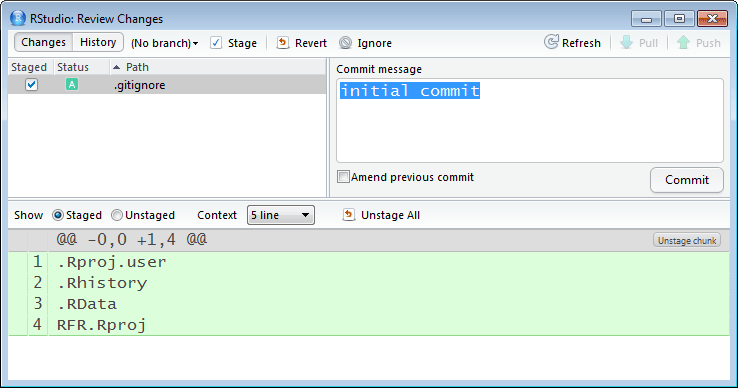
Git Commit Message
Then click the Commit button on the bottom right of the Commit message pane.
A Git Commit window opens to show you what you have committed.
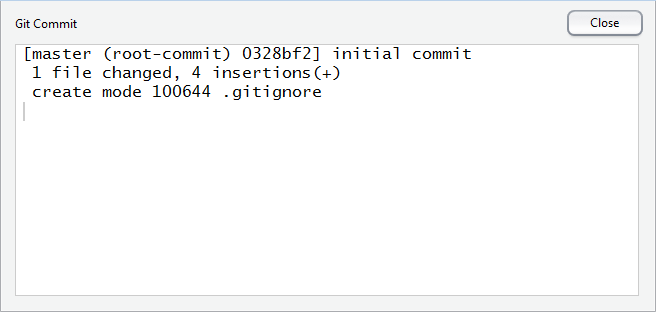
Git Commit conf
Click the Close button when you have read the summary of the commit.
Click the X button in the top right corner of the Review Changes window to close it.
The .gitignore will no longer be displayed in the Git tab.
Note the branch name is now master. This is seen by master being displayed next to the tools icon (cog) in the Git tab.
Commit messages are a reminder to you, and possibly others, of what changed in the project with this commit. It should be short (think tweet) since it will most often be viewed as a single line in a log of commits. The convention we will use in these articles is to start the commit message with the action, which is typically "added", "changed", or "removed". The action will be followed with what the action applied to. So examples would be "Added x feature" and "Changed y function's parameters".
The project history is summarized in a log.
We will display the log of our project.
Click on the history icon (looks like a clock and is left of the tools icon) in the Git tab.
The Review Changes window will be opened.
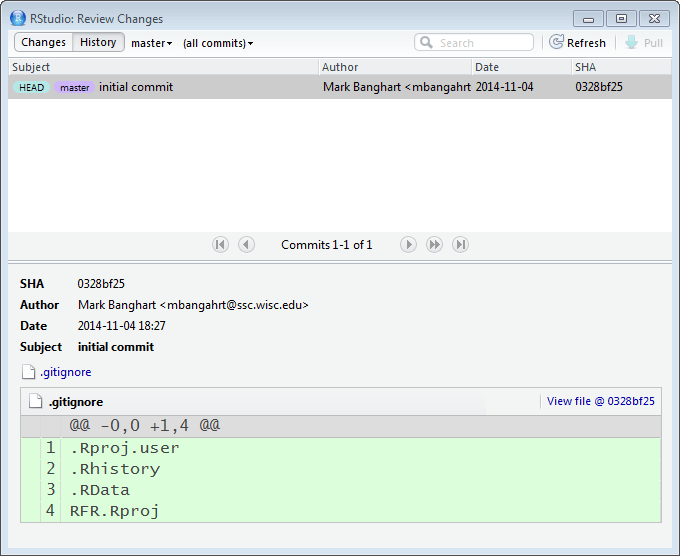
Git History
The master branch is displayed in the top pane. There is currently only one commit on the master branch. RStudio displays the branch, commit message text, who made the commit, date of commit, and an SHA identifier for each commit. The SHA identifier is useful when using Git commands from a shell. We will not need these SHA identifiers in RStudio. We will see more of the logs in the following articles.
The lower pane displays the changes to the files made with the selected commit. This is the same pane that we saw when we committed the .gitignore file.
The view in the Review Changes window can be changed between the history view (our current view) and the changes view (the view we used to commit.) To change the view click on the Changes or History button in the top left corner of the window.
Click the red X in the upper right corner of the Review Changes window to close the window.
The next articles will cover several additional Git functions. These are:
- diff, displays what has changed between commits
- revert, undo commits
- Central repository, support for a back up of your project on the network. This is useful when you work on a project while not connected to the network, such as when using a laptop.
The Git functionality supported in RStudio provides what is needed for day to day to source control. This functionality is only a small set of Git's features. All of Git's functionality can be used with R projects. The additional Git functions would need to be accessed using a Git GUI program such as SourceTree. See the Introduction article for information on Git GUI's.
Next: R Markdown
Previous: Introduction
Last Revised: 4/13/2015